

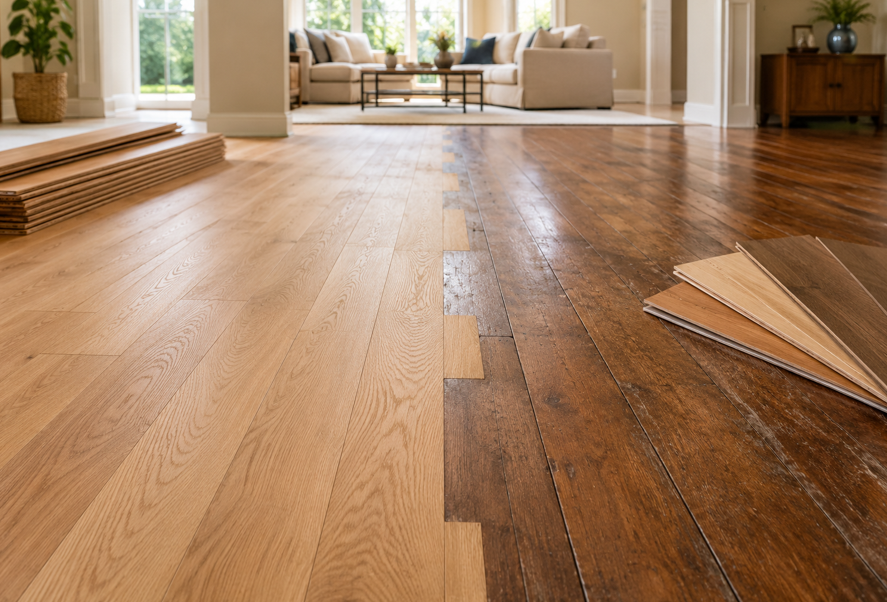
Why Matching Existing Hardwood Takes More Than Finding a Similar Color
Adding hardwood to a room that connects with an existing wood floor sounds simple until the samples come out. One board may look close in color but have the wrong grain. Another may match the species but be noticeably wider. A new finish may look perfect under showroom lighting and completely different beside a floor that has been exposed to years of Florida sunshine.
For Parrish homeowners, the goal is usually not to make new wood look artificially identical to every existing board. Real wood naturally varies. A successful blend makes the old and new areas feel intentional, balanced, and connected when you look across the space as a whole.
That process starts with understanding what is already in the home. Species, board width, thickness, grade, cut, finish, installation method, and age can all affect the match. At LG Kramer Flooring, homeowners can get help evaluating those details before choosing a product or planning an addition.
If you are extending hardwood into another room, replacing a damaged section, or opening a floor plan, these steps can help.
1. Identify the Existing Hardwood Before Shopping for New Boards
The first step is not choosing a stain. It is identifying the floor you already have as accurately as possible.
Start With the Wood Species
Oak is common in American homes, but even “oak” is not specific enough. Red oak and white oak have different natural tones and grain characteristics. The National Wood Flooring Association notes that red oak commonly carries a reddish tone and has an open grain, while white oak tends toward light brown with possible pinkish or grayish casts and different ray patterns.
Other species such as maple, hickory, walnut, cherry, or pine can create very different visual patterns. Matching color alone without matching the underlying species can leave two areas looking unrelated once light hits the grain.
Check Board Width and Thickness
Measure the visible face width of several boards rather than relying on one plank. Older floors may use dimensions that are less common in current product lines.
Thickness matters too, especially where the new flooring connects directly with the existing floor. A height difference can affect transitions and may require additional subfloor preparation.
Look at Grade, Character, and Saw Cut
Two floors made from the same species can still look very different. One may have a clean, consistent appearance while another includes more knots, mineral streaks, color variation, or natural character.
Saw cut also changes the grain pattern. Plainsawn, riftsawn, and quartersawn boards can show distinct visual characteristics even when they come from the same species.
The NWFA notes that wood floor appearance is influenced by factors including grade and saw cut, which is why matching the product name alone is not enough.
2. Determine Whether the Existing Floor Is Solid or Engineered
Before ordering a matching product, find out how the current floor is constructed.
Solid hardwood is made from one piece of wood. Engineered hardwood has a real wood top layer over multiple layers beneath it. Both are real wood flooring, but their construction affects thickness, installation methods, refinishing options, and how a new floor may connect to an existing one. The NWFA distinguishes these construction types and notes that solid floors can generally be sanded and refinished more times than engineered wood.
This becomes especially important when a remodel removes a wall between rooms.
If one room has existing solid hardwood and the adjoining space is being prepared for new flooring, the installer needs to consider:
Finished floor height
Subfloor type and condition
Board thickness
Installation method
Direction of the existing planks
Expansion requirements
Whether the existing floor will also be refinished
In some homes, using the same construction is the cleanest approach. In others, a compatible engineered product may work if the installation conditions call for it. The goal is a floor that performs well and looks cohesive.
3. Expect Some Natural Color Difference Between Old and New Wood
One of the biggest surprises in a blending project is that newly installed wood can be the correct species and still look different from the existing floor.
That is normal.
Wood changes in appearance as it ages and is exposed to light. The amount of change depends on the species, finish, stain, and room conditions. The NWFA’s species information shows that natural color variation exists within individual species and that some woods change noticeably with exposure and age.
Existing flooring may also have years of finish ambering, sunlight exposure, cleaning, and everyday use behind it. Fresh boards have none of that history.
Do Not Judge the Match From One Loose Board
A single new board laid on top of an established floor can exaggerate the difference.
Instead, evaluate several pieces together. Look at:
Overall undertone
Grain
Natural variation
Board width
Character
How the new material looks under the room’s actual lighting
A strong match often becomes more convincing when the full floor is installed and finished as a complete surface.
Decide Whether the Existing Floor Will Be Refinished
If the old and new sections can be sanded and finished together, there may be more opportunity to create a consistent appearance.
That does not mean every board will become the same color. Hardwood is a natural material, so variation is part of the look. The goal is to reduce an obvious “new room versus old room” effect while preserving a natural wood appearance.
4. Match Grain and Character Before Chasing the Perfect Stain
Color gets most of the attention, but grain can be even harder to disguise.
Imagine matching a floor with prominent open oak grain to a smoother species simply because both can be stained medium brown. From a distance, the color may seem close. Up close, the difference in texture and grain can make the transition obvious.
That is why species identification belongs near the beginning of the project.
Compare Multiple Boards
Natural wood varies from board to board. Look at a group of samples rather than expecting one plank to represent the entire floor.
For example, the NWFA describes considerable color and grain variation within white oak and great variation within red oak depending on origin and growing conditions.
Some variation between old and new sections can look natural when the species, cut, grade, and finish relate well.
Consider the Amount of Character
If the existing floor includes visible knots, mineral streaks, or strong color changes, a very uniform new product may look too controlled beside it.
The opposite is also true. A highly rustic new floor may stand out next to an existing floor with a clean, quiet appearance.
When comparing hardwood flooring, look beyond the display board and ask how the product’s full range of color and character will relate to the floor already in the home.
5. Match Board Width, Direction, and Layout
Even when species and color are close, layout can make the new section look added on.
Keep Width Consistent When Possible
If the existing floor uses a specific plank width, matching that width can create continuity across connected rooms.
A sudden change from narrow strip flooring to wide planks can work as a design choice, but it will look deliberate rather than seamless. If the goal is to make the addition feel original to the home, keeping the dimensions consistent is usually the cleaner visual approach.
Follow the Existing Direction
Board direction influences how the eye travels through the home.
Continuing the same direction can help separate rooms feel connected, particularly after walls are removed or doorways are widened. However, layout decisions also depend on installation requirements, subfloor conditions, joist direction in some applications, and the shape of the rooms.
That is why the most visually obvious direction is not always the only factor.
Plan Transitions Before Installation Starts
Doorways, hall openings, kitchen boundaries, and changes in room geometry deserve attention before the first new board is installed.
A planned transition can look polished. A last-minute one can draw attention to the difference the project was meant to hide.
6. Use Stain and Finish to Bring the Two Areas Together
Once the wood itself is reasonably compatible, stain and finish can help create the final visual blend.
Test Stain on the Actual Wood
Stain color depends on the species, grain, sanding, and how the wood absorbs the product. A stain name on a sample card does not guarantee the same appearance on every floor.
For a blending project, test samples on the new wood and, when practical, on a discreet prepared section of the existing floor.
View samples in the home during daylight and after dark under interior lighting. Parrish homes often receive strong natural light, and a color that looks neutral in one condition may reveal warmer or cooler undertones in another.
Match the Sheen as Well as the Color
A color match can still look wrong if one section is glossy and the other is matte.
The NWFA explains that wood floor finishes come in different types and that finish choice affects both protection and appearance. It also notes that oil-based finishes can add amber color, while some water-based finishes are normally clear.
Sheen influences how much light reflects from the floor. When two adjoining areas have different sheen levels, that contrast can become obvious even if the stain is similar.
Consider Finishing Old and New Areas Together
Where the existing floor has enough usable wood and the project conditions allow it, sanding and refinishing both sections together may offer the most cohesive visual result.
This approach can help unify color and sheen across the transition. It also gives homeowners an opportunity to update the overall look instead of trying to reproduce an older finish exactly.
7. Know When a Seamless Match Is Not the Best Goal
Sometimes the existing material cannot be reproduced closely enough to create a convincing seamless blend.
The original product may be discontinued. The old floor may use a board width that is hard to source. Years of color change may make a direct match unrealistic. A previous renovation may even have combined more than one species or finish.
In those situations, trying too hard to make two different floors look identical can make the difference more noticeable.
Create an Intentional Transition
A thoughtfully designed transition can be more attractive than an almost-match.
Depending on the layout, that may mean:
Using a clean threshold at a doorway
Changing direction at a natural room boundary
Introducing a border
Treating an adjoining room as its own flooring zone
Selecting a complementary wood tone instead of imitating the existing one
The right choice depends on how open the rooms are and how frequently both floors are visible at the same time.
Blend New Boards Into an Existing Area
For certain repair or extension projects, an installer may be able to weave or “tooth in” new boards rather than creating one straight dividing line.
This can distribute the transition across a broader area, which may make it feel more natural once the floor is finished.
Whether that approach is appropriate depends on the existing floor, board dimensions, installation, and the scope of the work. It requires careful planning and precise installation.
8. Account for Parrish Humidity and Indoor Conditions
Visual matching is only part of a successful hardwood addition. The old and new flooring also need to perform well together.
Wood reacts to its environment. In humid conditions it can gain moisture and swell, while drier conditions can cause it to lose moisture and shrink. The NWFA recommends maintaining a consistent indoor environment and explains that significant environmental changes can affect wood floor performance.
For Parrish homes, this makes indoor climate control especially relevant.
Evaluate Site Conditions Before Installation
A flooring professional may need to consider moisture conditions in the flooring, subfloor, and home before installation.
Preparation can vary by product and installation method, so acclimation is not simply a matter of leaving boxes in a room for a fixed number of days. The flooring manufacturer’s requirements and actual site conditions need to guide the process.
Keep the Home Environment Consistent
After installation, stable indoor conditions help both old and new hardwood respond more consistently.
That is particularly useful in Florida, where outdoor humidity can be very different from the conditioned environment inside the home.
A beautiful match on installation day is only one goal. The floor also needs to remain stable as part of the home.
9. Work With the Existing Floor Instead of Expecting Perfection
Real hardwood is not manufactured to look like a printed pattern where every board repeats exactly.
Its variation is part of what gives it character.
That means successful blending is usually about matching the important visual signals:
Species
Grain
Board width
Grade
Character
General color family
Sheen
Layout
Floor height
If those elements work together, minor variation can make the finished project look natural rather than mismatched.
Before deciding on a product, view larger samples and evaluate the old floor under different lighting. If refinishing is planned, discuss how the existing and new sections may respond before choosing the stain.
For complex remodels, professional evaluation can prevent decisions based only on a small sample or color name.
LG Kramer Flooring has NWFA-certified professionals on its team, and NWFA certification involves industry training and testing designed to validate wood flooring expertise. That type of knowledge can be particularly useful when a project involves existing hardwood rather than a completely blank slate.
Make Your Hardwood Addition Feel Like It Belongs
Matching new hardwood to an existing floor is part product selection, part design, and part skilled installation.
Start by identifying what you already have. Look at species, construction, width, thickness, grade, grain, and finish before choosing new material. Then decide whether the project calls for a close match, refinishing both areas together, weaving new boards into the old floor, or creating a deliberate transition.
Do not be discouraged if a fresh board looks slightly different from a floor that has been in the home for years. Natural wood changes with age, light, finish, and use. The best result is not necessarily a floor where every plank looks identical. It is a floor where the old and new areas make sense together.
For Parrish homeowners, indoor moisture conditions and installation details matter just as much as color. A carefully planned project can protect the flooring investment while creating a smooth visual connection between rooms.
If you are extending hardwood, repairing an existing area, or remodeling a Parrish home and want help evaluating the best way to blend new flooring with what is already there, get in touch with the LG Kramer Flooring team.